Check The Specs...

NAME: Curtis Sybesma and Gabe Strand

FARM: C. Dale Sybesma Farms

LOCATION: Platte, South Dakota

YEARS NO-TILLING: 22

ACRES: 3,800

CROPS: Corn, soybeans, wheat

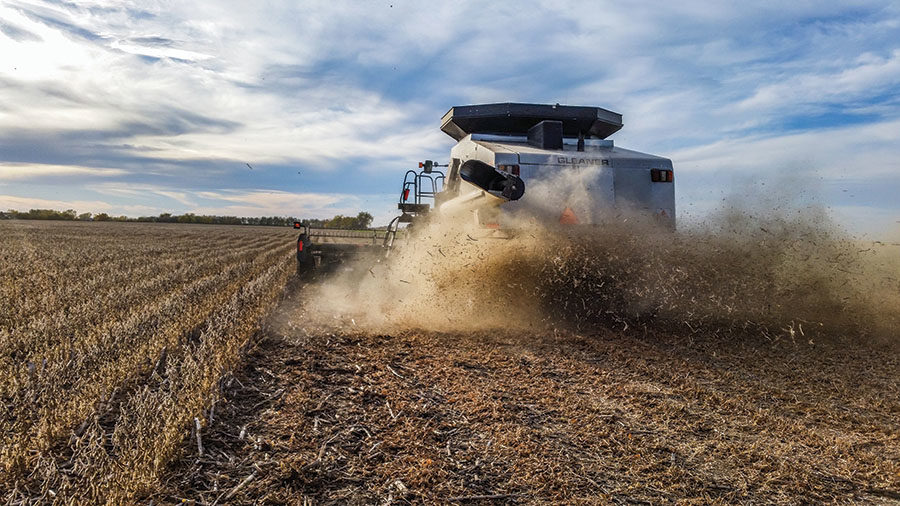
Moisture savings is what first sparked C. Dale Sybesma, my father, to be interested in no-till. In our flat southeastern corner of South Dakota, moisture is often a challenge.

We may get moisture, but it’s rarely at the right time, it seems. I think it was part of why our area stayed in pastures a lot longer than the tillable acres a bit further east.

Now, a lot of those pastures have been broken up to farm, including ground my grandfather purchased back in the 1970s. Back then he, and eventually my father, did a lot of cultivation. Every time they went through the field they were releasing moisture, which did not help their situation.

When my Dad first got interested in no-till in the early 1990s he was raising corn, wheat and milo and struggling to get good yields in many years due to the lack of moisture. He kept a close watch on our neighbor, who had started no-tilling corn into wheat stubble. He saw that it could be done and decided to give it a shot.

While he didn’t jump in with both feet initially, the practice did stick and we’re now 100% no-till. My brother-in-law, Gabe Strand, and I have kept up Dad’s no-till legacy, and between the two of us we get the job done pretty well.

I focus on harvest and spraying, while Gabe manages all of our planting operations. We now no-till corn, soybeans and wheat and continue to see the moisture-retention benefits that no-till can deliver.

Tackling Residue

Of course, residue is one of the first and continuing management issues we’ve had with no-till — especially as we work with wheat in the rotation. I was just a teen, but I do remember that being an issue for Dad. One of the first things we did when we started no-tilling corn into wheat stubble was to put chaff spreaders on our combines.

We’ve found that if wheat and soybean chaff isn’t spread evenly, you can really see it in the next crop. We tried baling our wheat straw for a while. Because there’s so much wheat stubble, sometimes it stays pretty wet and cold in the spring and that can hold up planting a bit.

Our thinking with baling was that if we removed some of the residue, we’d have an easier time getting into the field to plant corn.

Well, that plan backfired on us. The baler wouldn’t pick up the whole windrow and would leave a little path of fine chaff.

The next year, you could see exactly where the windrow was. There would be a strip of thin, yellow corn that definitely didn’t hold its own with the rest of the field.

So we went back to cutting the wheat as high as possible and taking full advantage of our chaff spreaders.

I harvest wheat and soybeans with a John Deere 8820 combine with a belt-drive chaff spreader that does a pretty good job of spreading chaff across the entire 25-foot header. I also use an R75 Gleaner combine with a 36-foot MacDon draper header. Its chaff spreader is hydraulically operated and also gets the job done.

When the wind is blowing during harvest I have a strategy to get the chaff spread evenly. Instead of giving up or fighting the wind, I use it to my advantage. If the wind is blowing from the north, I’m sure to combine on the south side of the field. That ensures that the chaff will blow away from the crop and spread fairly evenly in the stubble.

Biological Answer

As we continue to search out solutions for the mass of wheat stubble we contend with, we’re trying new things — including cover crops. We recently tried planting turnips and radishes into wheat stubble to help counter the high-carbon residue and accelerate decomposition.

20141017_135036.jpg

In 2013 we harvested our winter wheat and immediately seeded a mix of the two. It was a good year for moisture and they grew quite large, supporting soil life and providing us a little grazing for some of our cows. The cows just loved them. They were looking over the fence wanting back in after we moved them off the fields.

I would say the turnips and radishes were a success. Though I can’t outright say they put any cash in my pocket, there was the grazing benefit, and the large roots opened up the soil, allowing us to capture even more moisture. And, after they winterkilled and started to decay, they really helped cycle the tough wheat residue back into the soil. Where the turnips and radishes were planted, the soil seemed mellower.

I’m not sure if the radishes and turnips helped with yield. We’ll know more once harvest is in, but they did help break down the residue.

They do, however, take moisture to grow. This year we didn’t get much rain around wheat harvest, so we held off on planting the cover. We got a bit of rain in late August and tucked them in. They came up and then we got more timely rain.

I think we’ll have another good result with them this year. I’m really looking forward to harvesting the strips where we grew the covers to see if it makes a difference in yield.

Pushing Yields

One reason our wheat stubble is such an issue is that we’ve made some significant changes in our wheat management that resulted in higher yields and more residue. Just 10 years ago we were happy if our wheat made 50 bushels. Now we’re shooting for 70- to 80-bushel wheat.

IMG_2014105_092035164.jpg

The first thing that pushed our wheat yields was fungicide applications. Once we started using them our yields started climbing. Now our wheat gets two fungicide applications. The first one goes on with the herbicide application, usually just after tillering and before canopy. The second application is made during flowering.

The initial application is to prevent leaf rust and tan spot. The second serves to keep the flag leaf healthy and prevent head scab.

From what we understand, the health of the flag leaf plays a major role with how the head fills. I’d say that’s proven true with a 20- to 30-bushel yield increase in 10 years.

Thanks to technology we’ve also been able to even out fertilizer applications. We used to rely on spinner boxes to apply dry fertilizer. They worked OK, but you could see the lines in your wheat field where they missed or overlapped.

Now we use our 90-foot, pull-type Hardi 4400 Commander sprayer equipped with Ag Leader technology for auto-swath and rate control to apply liquid fertilizer. This technology has made our applications drastically more uniform, so we produce a better crop.

We put down 80 to 100 pounds of MAP (11-52-0) fertilizer with the drill, and then add the rest of our nitrogen in early spring. We like to apply the nitrogen early enough so that we don’t make a long-lasting track in the field. We’re able to follow that same track with GPS when we do fungicide applications, limiting our impact on the field.

Our sprayer is also set up to do variable-rate applications, so I do put down almost all of the nitrogen for all of our crops in season using liquid nitrogen in the sprayer. We use yield maps and soil types to determine what goes where.

Getting Precise

Precision technology isn’t only found on our sprayer. We’ve been working to be more precise, efficient and effective in our planting operations. We’ve made some pretty good strides in this area with some new technology and a few key attachments.

We use a 16-row John Deere 1770 no-till planter with a central commodity system to plant corn and soybeans. We went with the bulk-tank setup a couple years ago and really like it because it keeps you in your seat longer so you cover more acres faster.

It also has automatic row shutoffs and RTK-guided auto-steer so we minimize the waste of valuable inputs. We want every seed to produce and contribute to yield.

Our most recent addition is Precision Planting’s DeltaForce hydraulic down-force controls installed on each row unit on the planter.

It’s controlled by Precision Planting’s 20/20 SeedSense monitor and automatically adjusts down pressure on each individual row unit to accommodate field conditions in real time.

One of the main reasons we made this investment is we wanted the ability to maintain consistent ground contact and seed depth while reducing unnecessary compaction caused by too much down force when closing the seed trench.

This is especially important because we currently have fixed Yetter SharkTooth row cleaners. Because they’re fixed and rigid, they may lift up the seed unit, and with our regular down pressure that would have resulted in a shallow-planted seed or even a seed sitting on top of the ground.

With hydraulic down pressure we’re able to maintain that depth, even with the row-unit movement.

One thing we learned this first planting season was we were probably using way too much down pressure before, which was compacting the seed trench. With this system we use the smallest amount of pressure possible to get the job done.

With these technological investments we observed very even emergence this year. Also, we noted that all the stabilizer roots on the corn were about the same, indicating a very even, consistent seed depth. It was definitely a more uniform crop than the previous year, even with corn-on-corn. The proof will be in our yield data, but based on field scouting it looks very promising.

In The Trenches

Creating and closing our seed trench to create perfect seed-to-soil contact is another challenge. This is where our attachments come in.

We’ve opted to use a reduced inner diameter (RID) gauge wheel with a MudSmith rim. That’s because moisture is as much of an issue for us when we do have it as when we don’t. Especially with our dense wheat stubble, it’s not uncommon for us to find ourselves planting in wet conditions.

Where a regular gauge wheel will plug up with mud and force you to stop, this spoked rim allows mud to pass through and has a self-cleaning feature that keeps you moving when you need to plant.

For our closing system we use Pro-Stitch closing wheels. These are blunt-spiked closing wheels invented by Danny Wipf, a farmer who lives not far from us and battles the same varying conditions with no-till. The blunt design crumbles the seed trench closed, creating excellent seed-to-soil contact.

Another thing is that they crumble the seed trench from both sides while firmly sealing it shut, without compacting the trench. We feel it helps us eliminate compaction and air pockets, and creates a nice, mellow seedbed for excellent emergence.

A Keeton seed firmer is also used to ensure the seed is pressed into the bottom of the trench, not stuck to the side or misplaced.

We use the planter for corn and soybeans. We figure if we have all the technological bells and whistles, we might as well use it to get better efficiency, uniformity and placement for soybeans, too.

There are additional benefits, such as the planter being 10 feet wider than our drill. And because we’re being more precise in placement we can cut our seeding rates. When we were doing what I like to call a ‘controlled spill’ with the drill we would drop around 180,000 seeds per acre. Now we only plant about 140,000 seeds per acre and get the same plant population in the end.

When we used the drill the soybeans did canopy faster due to the 15-inch rows versus the 30-inch rows we have with the planter. But we like that we now get a taller soybean that is easier to harvest. We can also drive down the rows with the sprayer and not run over any soybeans.

Drilling Success

While I joke that drilling is a controlled spill, our drill actually is set up to do a very good job. We use a John Deere 1900 air cart with a 1860 John Deere drill. In 2013 we updated everything on it so it’s really a 1910 air cart and an 1890 drill.

We changed the seed boots from the old two-piece models to the new single-piece style. The old ones didn’t do a great job with seed placement. They would try to shoot the seed into the ground, where the new system (actually a throwback to the older style of seed boots) runs more parallel to the ground and lays the seed down.

When we rebuilt the drill we went out and visited with Wipf. On his advice, we installed Pro-Stitch gauge wheels and closing wheels, and also got a kit from him that allowed us to tighten up our seed boots. As the holes get worn, the seed boot ends up having too much up-and-down play. This kit keeps the boot in the ground.

He also got us to put on a tab that firms the seed into the ground. It’s a little longer and made with heavier plastic than the factory replacement. It does a good job firming the seed into the ground so residue doesn’t get in the way before the closing wheel covers the seed trench.

Corn and soybean genetic advancements have resulted in stalks that are a lot harder than they were in the past. As a result, rubber gauge wheels don’t cover as many acres as they used to before wearing out. That’s why we like that the Pro-Stitch gauge wheel is plastic. The rubber gauge wheels would wear out every year, but the Pro-Stitch wheels have held up really well.

We also like having the Pro-Stitch closing wheels on the drill better than the old cast iron closing wheel. We’d watch the closing wheel bounce over the residue and actually leave the ground. When it’s bouncing, it’s not closing the trench. The spiked wheels ride much smoother and have more contact with the ground, crumbling the trench closed.